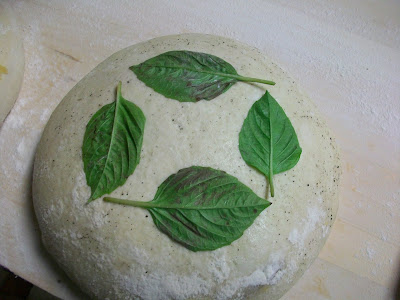
Today, we have some photos of our Garlic and Basil loaf. Last night, while I was doing some research I found a blog with a roasted garlic loaf that had a very unique topping. When I was first admiring the loaf, it looked like a stencil, which I have some experience using, but the photos that followed showed me something quite different.
The baker used fresh herbs on top of the loaf, which then proceeded to dry out during the baking process. This leaves you with a gorgeous natural design on top. It can also be used to help identify what is inside the bread. This technique is used more so in pastry baking. An example would be when you're making a carrot cake with a nut filling. You would want to top it with some of the same nuts that are used in the ingredients to let the customer have a preview of whats inside! This is usually only important in the case of a severe allergy, but can also be used for aesthetic appeal- and thats what we will use it for in this case! ( I have recently discovered that it i, in fact, possible to have an allergy to basil. I am guessing it is not that common, because I have never heard of anyone having it! But with that being said it now makes this bread topping multi-functional!
Sooo, I will now take you through the process of stenciling your breads or placing a creative design on top.
First step, make bread to apply this technique to! Sounds basic, I know, but the process of making bread is very complex! Usually, I like to use sourdough because of the crust color of the finished loaf helps accentuate the stencil! As the title hints towards, we have used Garlic Basil dough. (side note: we use local basil in this bread!)
This boule was kept overnight in our retarder sitting in a round wicker basket for its necessary fermentation time. When the dough was proofed to its proper size it was then turned out of the basket onto the peel for finishing or scoring. In this case, I used a water bottle to spray the top of the loaf. The spraying of the loaf is for two reasons: a) to help dissolve any flour left on top from the basket, and b) to allow the flour or any other topping to stay in place! I then placed the fresh basil on top in a decorative fashion.
After placing the basil on top, I then sifted enough flour to lightly cover the whole loaf and the herbs. If too much flour is sifted on top the loaf can easily become in-eadible. You want to add just enough to have an appealing look but not too much that you can see clumps of flour all over the top. This may take some practice!
The last step before baking is scoring. There are many options for this step. I decided to go with a 45 degree angle all the way around the basil to help lift and display all the work I put into this design. There are other options available to you as well. Two that I like are either the "fan style" of scores reaching up to the basil from the base, or the "box style" with straight 90 degree cuts around the basil.
The finished product! The basil shrunk and lifted leaving a very nice outside flour line around it! Overall, the loaf came out very nice with a great score that lifted evenly all the way around. Really achieving the desired affect. This technique can be time consuming, which means it would be very difficult for large production needs! I hope this was helpful and interesting! Also, if you are reading this on Wednesday the 25th you can stop in and check out this loaf in the display window, and why not just pick up a Garlic and Basil loaf while you are looking!
Thanks for reading,
Have a wonderful day!


No comments:
Post a Comment