Apple, pancetta and smoked Gouda risotto served with hazelnut pesto crostini. $9.45
Chicken Cordon Bleu with Gorgonzola sauce accompanied with red flannel hash
and sauteed green beans. $10.45
Pork Posole - A wonderful Mexican stew featuring pork, tomatillos, hominy and green chiles
joined by house made cornbread. $8.95
Boeuf Bourguignon - A classic French dish served with beef, Burgundy wine, pearl onions and mushrooms, served with buttered egg noodles. $10.95
New England Clam Chowder with a warm baguette. $8.95
Penne ala Vodka tomato, fresh basil and grated Parmesan Reggianito
served with chile oil crostini. $8.25
And as always Every Wednesday is Fried Chicken night. $9.45
Tuesday, December 7, 2010
Thursday, November 4, 2010
Dinner Selections for November
Beef Carbonade Flamande with roasted red potatoes and sautéed Brussels sprouts. $9.45
Cornish game hen with cranberry green apple chutney joined by house made bread stuffing and roasted acorn squash. $10.45
German galuskis with Sourdough rye bread. $8.95
Sweet potato gnocchi with basil pesto cream sauce and roasted garlic crostini. $9.25
Grilled sea scallops served over a bed of creamy corn grits and finished with a roasted leek and apricot glaze. $12.45
Black bean and tofu chili topped with fried tortilla strips and yoghurt. $8.25
Every Wednesday night is Fried Chicken night. $9.45
We strive to use the freshest ingredients. Specials are subject to change without notice.
WheatFields Lunch Specials November 4th- November 10th
Thursday 4th – Medianoche sandwich – Ham, marinated pork, pickles, roasted red peppers, whole grain mustard and Swiss cheese grilled on a brioche roll. $6.75
Friday 5th –Oven roasted beef brisket with spicy coleslaw and Cheddar cheese grilled on a ciabattina. $5.45
Saturday 6th – Pancetta and roasted corn salad with caramelized onions, cucumbers and diced tomatoes tossed with mixed greens and sherry wine vinaigrette. $6.95
Sunday 7th – Crab and artichoke salad with greens and mayonnaise on WheatFields Kalamata Olive bread. $7.25
Monday 8th – Portobello mushroom, sun-dried tomato pesto and Brie cheese bruschetta with a side salad. $6.45
Tuesday 9th – Greek salad – Dolmas, Nicoise olives. cherry tomatoes, cucumbers and Feta cheese atop mixed greens. Served with garlic rounds. $7.45
Wednesday 10th – Antipasti plate – Assorted cured meats and cheeses with baguette rounds. $7.25
Tuesday, October 19, 2010
Sprouted Grains
Good Afternoon,
We are back with a quick how-to article on Sprouting Grains. There are many views and ways to go about Sprouting Grains, this is just one of the many. Grains has many nutritional and enzymatic qualities that increase significantly with the sprouting process. One of the most obvious is the sweetness in the flavor and the aroma that occurs.
For this example, I have used 7 lbs of Wheat Berries, 3.5 lbs of Cracked Wheat, and 3.5 lbs of 7 grain mix (wheat, rye, oats, barley, corn, buckwheat and flax). For home use, do not use this large amount of grain, you will have far too much to use! Bring it down to maybe 1lb of Wheat Berries, 1/2 lb of Cracked Wheat, 1/2 lb of 7 grain mix. In other instances, I have used just Wheat Berries and a 9 grain mix.
 MEP to Start:
1. Container with a lid
2. 100 degree Water
 The amount of water depends on the amount of grains used. You want to add 120% of your grain grain weight in water. So if you are using 2 lbs of grains you will use 2 lbs 6 oz of 100 degree water.
 Once the water is scaled out, add it to your grains and stir it around a little. After it is all combined, just place the lid on and let it sit. We will leave the grains soaking for two days in the same water. So, make sure to put it in a safe place that will stay at room temp for two days.

This picture is an example of where NOT to put the grains for two days! The oven is unsafe because of the burners and also the drastic change in temperature when the oven or stove is turned on!
Check the grains after Day 1 is complete, remembering to use all of your senses! The mixture should of changed in the way it smells and feels. You should be able to instantly smell the sweetness coming from the grains. The water should also be cloudy and have a grimy feel to it. Place the lid back on and wait another day!

Day 2 has finally arrived! I know, it seems like an eternity of waiting but I want to assure you that it is well worth it.
The first thing we want to do today is observe the grains again. Once you have observed and made sure to use all your senses, it is time to drain the grains. You can use a colander for this or another type if fine strainer. Just make sure that the holes are not too large to let the grains run through. We need the grains to drain for 30 minutes. Maybe you can set a timer and then go for a quick jog?

After the jog, or the 30 minutes is over we are going to run water over the grains until the water becomes clear. This is one step you do not want to rush, because if it is not rinsed long enough it will hold onto a bitter flavor. It will take a few minutes, just make sure the water comes through clear.


We are back with a quick how-to article on Sprouting Grains. There are many views and ways to go about Sprouting Grains, this is just one of the many. Grains has many nutritional and enzymatic qualities that increase significantly with the sprouting process. One of the most obvious is the sweetness in the flavor and the aroma that occurs.
For this example, I have used 7 lbs of Wheat Berries, 3.5 lbs of Cracked Wheat, and 3.5 lbs of 7 grain mix (wheat, rye, oats, barley, corn, buckwheat and flax). For home use, do not use this large amount of grain, you will have far too much to use! Bring it down to maybe 1lb of Wheat Berries, 1/2 lb of Cracked Wheat, 1/2 lb of 7 grain mix. In other instances, I have used just Wheat Berries and a 9 grain mix.

1. Container with a lid
2. 100 degree Water


This picture is an example of where NOT to put the grains for two days! The oven is unsafe because of the burners and also the drastic change in temperature when the oven or stove is turned on!
Check the grains after Day 1 is complete, remembering to use all of your senses! The mixture should of changed in the way it smells and feels. You should be able to instantly smell the sweetness coming from the grains. The water should also be cloudy and have a grimy feel to it. Place the lid back on and wait another day!

Day 2 has finally arrived! I know, it seems like an eternity of waiting but I want to assure you that it is well worth it.
The first thing we want to do today is observe the grains again. Once you have observed and made sure to use all your senses, it is time to drain the grains. You can use a colander for this or another type if fine strainer. Just make sure that the holes are not too large to let the grains run through. We need the grains to drain for 30 minutes. Maybe you can set a timer and then go for a quick jog?

After the jog, or the 30 minutes is over we are going to run water over the grains until the water becomes clear. This is one step you do not want to rush, because if it is not rinsed long enough it will hold onto a bitter flavor. It will take a few minutes, just make sure the water comes through clear.

Now that the grains are rinsed we want to let them dry for 2 hrs before we grind them.
MEP for Grinding:
1. Meat Grinder, Food Processor
2. Bags for storage
Depending on the size of the food processor you are using, only grind a few pounds at a time. In the one In the one I was using, I filled the container with 1 1/2 lbs of grains. Allow the grains to grind for at least 30 seconds or so, enough time to make sure all the grains have been ground. You are not going to want a smooth mixture, just a uniformly ground mixture. After grinding, place the grains in ziplock bag and freeze unless you are using them immediately. As you can tell by the picture, this process will be messy.

There you have it! Once I have done a little more research I will have a short article on the benefits and qualities of Sprouted Grains. I should also have a few pictures of some finished products we will be testing this week.
Have a Wonderful Day!
Bake That Bread,
Josh
Tuesday, September 14, 2010
Sour Culture Final Product
Good Morning Readers,
The long-awaited "Sourdough Issue" has arrived! I will be bringing you through all the steps necessary to making your own homemade loaf of sourdough! I hope you took care of your starters, and fed them well, because they will be put to good use today! There will be a recipe posted in the beginning, but this recipe is just a basic formula! You have creative freedom to be adventurous; after all, it is your loaf of bread. And the good news is if it doesn't work the first time you can try again until it does.
Are your ready? I know I am. Let's get started!

MEP List:
1. Scale
2. Towel (To Cover Dough While Resting)
3. Large Bowl
4. Sour Culture
5. Water (80 deg or lukewarm to the touch)
6. Flour (Flour in photo is not what I used, just for show)
7. Salt
Now, for the formula...
Sour Culture 260 gr or 10 oz
Water 422 gr or 15 oz
Bread Flour 612 gr or 22 oz
Whole Wheat Flour 45 gr or 2 oz
Salt 18 gr or 1 oz
I have placed all these ingredients in the order you should place them in the bowl. Please note: ounce weights are not the same as ounces in volume- be sure to weigh it out to ounce weight. 1 oz of Sour Culture is not equal to 1 ounce of water in volume, only in weight. This is very important because if you measure it out in ounce volume it will mess up your whole recipe! The saying, "A pint is a pound the world around," is not correct! A pint of flour, especially sifted flour, is not going to weigh the same as a pint of water. Now, with that cleared up I have consulted a book called, "The Book of Yields," that can convert all of these weights into cup measures if you prefer a volume approach or you simply do not have a scale handy.
Sour Culture 1 Cup
Water 1.9 Cups
Bread Flour 4.6 Cups
Whole Wheat Flour .5 Cups
Salt 1.5 T
These numbers are not precise, so you might need to add some flour or water depending on how the dough feels.
Get ready for the long haul because we are mixing this dough by hand, and this process will take over 2 hrs until we are completely finished.
First, place the water and culture in the mixing bowl and dissolve the culture in the water. Make sure to have some culture left over to feed. (Side note: You can feed the culture now or after we are finished mixing. If you want to keep it going feed it and leave it out as usual. If you don't plan on using it for a while, feed it and place it immediately into the fridge.) Back to our regular scheduled program. Once the culture is dissolved, add your flour and salt on top. Start mixing by hand, making sure to incorporate all the flour. You should be left with a very sticky clump of dough. The dough shouldn't be extremely stiff and tough to mix, but it also shouldn't be soupy either.

After everything is incorporated, cover with a towel and look at the clock.

Time is essential in this exercise. This dough is going to bulk ferment for 2 hours, and every 20 minutes we are going to fold the dough. Now, you might of just heard a few words that are foreign to you so let me explain. Bulk Fermentation- time we let the dough sit, allowing the culture to do its magic producing alcohol and carbon dioxide. During this time we are starting to develop some flavor and also allowing the gluten in the dough to relax. Folding- process of stretching and lifting the dough over itself to develop the gluten and de-gas the dough.
The folding technique shown can be done with two hands, but for me my other hand was preoccupied with the camera. We want to do this to the dough every 20 min for 2 hrs. By the end, the dough should become less tacky and more of a smooth ball of dough.

After the 2 hrs, we are going to be dividing the dough evenly to be shaped. You can either cut the dough in half and make two 1.5 pound loaves or if you have a scale you can cut it into whatever size pieces you desire! Before we get started on dividing, we need to get our MEP for finishing ready.
MEP List:
1. Flour (for dusting the table)
2. Bench knife (to cut the dough)
3. Bowls (for the dough to ferment overnight)
4. Pan Spray
Once the MEP is setup, get the dough out of the bowl and place it on a floured table surface.

We are now going to divide the dough into desired weights. I wanted to use some of my dough for pizza so I cut mine a little differently.

When you have the dough divided, we are going to shape it into a ball or boule. The rounding technique is something that I am so used to doing I didn't think about having a video for you. If you are unsure how exactly to round a ball of dough, go to YouTube and type in "rounding dough"!

Now that the dough is shaped we want to place it in our bowls to ferment overnight in the fridge. Before we just place it in the bowl we need to spray the bowl with our pan spray and then flour over top of the spray. If you just place the dough into the bowl without spray or flour, you would find that the dough would be stuck and it would not come out tomorrow morning! Let me tell you, that is one of the most frustrating experiences ever. All the time invested into that loaf of bread only to be destroyed because it will not come out of the bowl! So please, make sure to spray and then flour very well.

Then place the dough seem side up. The seem would be the bottom part of the dough that was in contact with the table while shaping. We want to leave the dough at room temperature for one hour and then place it in the fridge overnight. Letting it ferment overnight in the fridge helps develop flavor in the dough. Giving the yeast as much time as possible to produce. While it is fermenting we want to keep it covered, I would suggest a plastic bag that fits loosely around the bowl.

And we wait. Well, you don't have to wait, you can sleep! You want to leave the loaf in in the fridge for roughly 18 to 24 hours. Any more than 24 hrs and it will over ferment and leave you with a terrible product that will taste and smell alcoholic.
So, now that 18 to 24 hours have passed, let's pull the dough out of the fridge and let it sit at room temp for 1 hr. During this hour, you can get your oven preheated to 470 deg. Also, ten minutes before you bake your sourdough, place a container of water into the over to create steam. A loaf pan or 13X9 in pan half filled with water should do the trick.
If you are using a baking stone:
Place the baking stone into the oven when you turn the oven on for preheating.
When you are ready to score your dough, use hot pads to pull out the baking stone and place the loaf on the stone. Score it quickly and place it immediately back in the oven. This process would need to be done carefully and quickly, so the stone doesn't cool off too much.
If you are using a baking or cookie sheet:
If you are baking on a cookie sheet place the dough on the sheet and score. Once you have it scored, place it in the oven and bake! I would suggest using parchment paper in between the cookie sheet and dough.
Scoring the dough is the process of cutting the dough in a certain design, or shape, which will allow the dough to expand in that specific spot. If you do not score your loaf it will not get as much volume and will also burst at the weakest point of the loaf, and that usually looks pretty bad. I did a basic tic-tac-toe style score with a razor blade. This can also be done with a serrated paring knife.


The long-awaited "Sourdough Issue" has arrived! I will be bringing you through all the steps necessary to making your own homemade loaf of sourdough! I hope you took care of your starters, and fed them well, because they will be put to good use today! There will be a recipe posted in the beginning, but this recipe is just a basic formula! You have creative freedom to be adventurous; after all, it is your loaf of bread. And the good news is if it doesn't work the first time you can try again until it does.
Are your ready? I know I am. Let's get started!

MEP List:
1. Scale
2. Towel (To Cover Dough While Resting)
3. Large Bowl
4. Sour Culture
5. Water (80 deg or lukewarm to the touch)
6. Flour (Flour in photo is not what I used, just for show)
7. Salt
Now, for the formula...
Sour Culture 260 gr or 10 oz
Water 422 gr or 15 oz
Bread Flour 612 gr or 22 oz
Whole Wheat Flour 45 gr or 2 oz
Salt 18 gr or 1 oz
I have placed all these ingredients in the order you should place them in the bowl. Please note: ounce weights are not the same as ounces in volume- be sure to weigh it out to ounce weight. 1 oz of Sour Culture is not equal to 1 ounce of water in volume, only in weight. This is very important because if you measure it out in ounce volume it will mess up your whole recipe! The saying, "A pint is a pound the world around," is not correct! A pint of flour, especially sifted flour, is not going to weigh the same as a pint of water. Now, with that cleared up I have consulted a book called, "The Book of Yields," that can convert all of these weights into cup measures if you prefer a volume approach or you simply do not have a scale handy.
Sour Culture 1 Cup
Water 1.9 Cups
Bread Flour 4.6 Cups
Whole Wheat Flour .5 Cups
Salt 1.5 T
These numbers are not precise, so you might need to add some flour or water depending on how the dough feels.
Get ready for the long haul because we are mixing this dough by hand, and this process will take over 2 hrs until we are completely finished.
First, place the water and culture in the mixing bowl and dissolve the culture in the water. Make sure to have some culture left over to feed. (Side note: You can feed the culture now or after we are finished mixing. If you want to keep it going feed it and leave it out as usual. If you don't plan on using it for a while, feed it and place it immediately into the fridge.) Back to our regular scheduled program. Once the culture is dissolved, add your flour and salt on top. Start mixing by hand, making sure to incorporate all the flour. You should be left with a very sticky clump of dough. The dough shouldn't be extremely stiff and tough to mix, but it also shouldn't be soupy either.

After everything is incorporated, cover with a towel and look at the clock.

Time is essential in this exercise. This dough is going to bulk ferment for 2 hours, and every 20 minutes we are going to fold the dough. Now, you might of just heard a few words that are foreign to you so let me explain. Bulk Fermentation- time we let the dough sit, allowing the culture to do its magic producing alcohol and carbon dioxide. During this time we are starting to develop some flavor and also allowing the gluten in the dough to relax. Folding- process of stretching and lifting the dough over itself to develop the gluten and de-gas the dough.

After the 2 hrs, we are going to be dividing the dough evenly to be shaped. You can either cut the dough in half and make two 1.5 pound loaves or if you have a scale you can cut it into whatever size pieces you desire! Before we get started on dividing, we need to get our MEP for finishing ready.
MEP List:
1. Flour (for dusting the table)
2. Bench knife (to cut the dough)
3. Bowls (for the dough to ferment overnight)
4. Pan Spray
Once the MEP is setup, get the dough out of the bowl and place it on a floured table surface.

We are now going to divide the dough into desired weights. I wanted to use some of my dough for pizza so I cut mine a little differently.

When you have the dough divided, we are going to shape it into a ball or boule. The rounding technique is something that I am so used to doing I didn't think about having a video for you. If you are unsure how exactly to round a ball of dough, go to YouTube and type in "rounding dough"!

Now that the dough is shaped we want to place it in our bowls to ferment overnight in the fridge. Before we just place it in the bowl we need to spray the bowl with our pan spray and then flour over top of the spray. If you just place the dough into the bowl without spray or flour, you would find that the dough would be stuck and it would not come out tomorrow morning! Let me tell you, that is one of the most frustrating experiences ever. All the time invested into that loaf of bread only to be destroyed because it will not come out of the bowl! So please, make sure to spray and then flour very well.

Then place the dough seem side up. The seem would be the bottom part of the dough that was in contact with the table while shaping. We want to leave the dough at room temperature for one hour and then place it in the fridge overnight. Letting it ferment overnight in the fridge helps develop flavor in the dough. Giving the yeast as much time as possible to produce. While it is fermenting we want to keep it covered, I would suggest a plastic bag that fits loosely around the bowl.

And we wait. Well, you don't have to wait, you can sleep! You want to leave the loaf in in the fridge for roughly 18 to 24 hours. Any more than 24 hrs and it will over ferment and leave you with a terrible product that will taste and smell alcoholic.
So, now that 18 to 24 hours have passed, let's pull the dough out of the fridge and let it sit at room temp for 1 hr. During this hour, you can get your oven preheated to 470 deg. Also, ten minutes before you bake your sourdough, place a container of water into the over to create steam. A loaf pan or 13X9 in pan half filled with water should do the trick.
If you are using a baking stone:
Place the baking stone into the oven when you turn the oven on for preheating.
When you are ready to score your dough, use hot pads to pull out the baking stone and place the loaf on the stone. Score it quickly and place it immediately back in the oven. This process would need to be done carefully and quickly, so the stone doesn't cool off too much.
If you are using a baking or cookie sheet:
If you are baking on a cookie sheet place the dough on the sheet and score. Once you have it scored, place it in the oven and bake! I would suggest using parchment paper in between the cookie sheet and dough.
Scoring the dough is the process of cutting the dough in a certain design, or shape, which will allow the dough to expand in that specific spot. If you do not score your loaf it will not get as much volume and will also burst at the weakest point of the loaf, and that usually looks pretty bad. I did a basic tic-tac-toe style score with a razor blade. This can also be done with a serrated paring knife.


As soon as you score the loaf you want to get it in the oven quickly. The longer it is out of the oven the more gas it is losing out of the cuts. After 15 min in the oven pull out the water. Depending on size, it could take anywhere from 25 min to 1 hr. Make sure to keep an eye on it, there is no exact time that will always work. It is done when it is done! If you read farther down I have included a few tips for some visual cues that should help you determine the "done-ness" of your loaf.

I had the convenience of using our amazing Llopis oven at work! I figured I would give you an exclusive peak inside of our oven.
You want to get a nice golden to dark brown color on your loaf to maximize flavor. I always say color is flavor, so the darker it is the more complex flavor you will get. Until it gets black, now thats just burnt!

You now have your very own Sourdough! From start to finish, it was all you! Congratulations! Before you get to eager and cut it open hot, one of the many important steps in baking is cooling. So, allow it to cool and then cut it open and enjoy! Make sure to taste it constructively, see what you can do better or different. Maybe you want more acidity or maybe less! If you want more acidity, try using colder water during your feeds or warmer if you want less acidity. It is your sour culture now, take care of it and use it well!

I hope this was helpful! Please post a comment with a picture of your final product. I would love to see them!
Bake That Bread,
Josh
Wednesday, September 8, 2010
Happy Wednesday!
Good Afternoon,
How was the Labor Day weekend? Anybody forget about their culture? Still feeding them everyday? You have to make sure to stay on top of it everyday, and you will be rewarded in the end with a culture that could a lifetime! Wouldn't it be an amazing opportunity to have something like that passed down through the family? A family heirloom sour culture! A weird thought, I know, but a very rewarding one as well.
If you have any questions at all with starting your own culture, please post them on here. That way we can share the info with everyone!
Next week, I should have the start of a series on Sprouting Grains! I am very excited about this experiment! Sprouted Grains produce some amazing recipes and oh, by the way have great health benefits! Make sure to stay tuned into the blog! Also, if you have any topics, pertaining to bread or even pastry, feel free to post a comment about it, and I will see what I can come up with for you!
I want to leave you with this article a Chef sent me recently! Some great info for you....
http://www.foodprocessing.com/industrynews/2010/096.html
Bake That Bread,
Josh
Saturday, September 4, 2010
Sour Culture Day 5
Happy Saturday!
Today is the all important Day 5 of our sour culture feeding! The feeding we do today will be will be continued for as long as you use it to keep the culture alive and strong. Once you feel more comfortable with the recipe, you do have the freedom to tweek the amounts a little bit and see how it affects your final product. Keep you eye on the blog, in the near future I will post an article on how to change the acidity levels in your sour culture. One quick thought to keep in mind, more acidity equals less volume and less acidity equals more volume!
Now, on to today's feeding! Let's get our MEP setup.
 MEP List:
1. New Bowl
2. Scale
3. Water (227 gr or 1 cup)
4. Flour (340 gr or 1 1/2 heaping cups)
5. Culture (113 gr or 1/2 cup)
MEP is pretty much the same as yesterday, just a change in the amounts of ingredients! The ratio changes to 3 parts flour to 2 parts water to 1 part culture.
For mixing, scale the 113 gr of culture into the bowl, making sure to observe the culture using all of your senses! Once the culture is scaled, add your water on top and give it a quick hand mix. Now, place your flour on top and knead it together. The culture will now become what we call a stiff levain which means the culture will be more of a dough than days past. If you have a KitchenAid Mixer, it might be easier to mix it there with a paddle or dough hook.

Once you have it mixed, return it to the washed container and cover it until tomorrow. You can now throw away the old culture leftover from today. Everyday you will have a little culture leftover, and the leftovers can be thrown away or they can be used start another culture. If you want to try one with a different flour blend or even some additions, now would be the time. My suggestion would be to add a small percentage of Whole Wheat flour everyday, even just 5-10% is enough to change the acidity of the culture but not affect the overall color or flavor. It is you culture, have fun with it and take care of it.
For the next four to five days, feed the culture just like you did today. The culture is not strong enough to make your own sourdough yet, but next Saturday I will post a recipe for you. I will feed mine until then as well and make a loaf next Saturday with you.
After next Saturday, if you do not want to feed it everyday, feed it and immediately put it in the refrigerator in a sealed container. When you want to use it pull it out and let it sit at room temp for one full day. For the next two days, feed it like we did today, and your culture should be up and ready to go.
The culture can last in the fridge for 3 weeks, if you plan on having it in there longer, freeze it. When you want to use it again, pull it out for a day and then give it at least 3 to 4 days of feedings before you use it again.
You now officially have your own Sour Dough Culture!!!!!!!!!!!!!! Way to go! It wasn't that hard at all, no magic or secret tricks. Using and making your culture is one way to keep us connected to our past! This process has been used for thousands of years! Keep the tradition going, pass it on, share it with a friend! Baking is all about sharing! And Sharing is Caring!
If any of you want to post pictures of successful cultures, or in a week, pictures of successful sourdough loaves, be my guest! I would love to see them. Or, if you are having some problems, the best way I can help is by seeing the culture!
Have a great weekend and don't forget to take care of you culture!
Bake that Bread,
Josh
Today is the all important Day 5 of our sour culture feeding! The feeding we do today will be will be continued for as long as you use it to keep the culture alive and strong. Once you feel more comfortable with the recipe, you do have the freedom to tweek the amounts a little bit and see how it affects your final product. Keep you eye on the blog, in the near future I will post an article on how to change the acidity levels in your sour culture. One quick thought to keep in mind, more acidity equals less volume and less acidity equals more volume!
Now, on to today's feeding! Let's get our MEP setup.

1. New Bowl
2. Scale
3. Water (227 gr or 1 cup)
4. Flour (340 gr or 1 1/2 heaping cups)
5. Culture (113 gr or 1/2 cup)
MEP is pretty much the same as yesterday, just a change in the amounts of ingredients! The ratio changes to 3 parts flour to 2 parts water to 1 part culture.
For mixing, scale the 113 gr of culture into the bowl, making sure to observe the culture using all of your senses! Once the culture is scaled, add your water on top and give it a quick hand mix. Now, place your flour on top and knead it together. The culture will now become what we call a stiff levain which means the culture will be more of a dough than days past. If you have a KitchenAid Mixer, it might be easier to mix it there with a paddle or dough hook.

Once you have it mixed, return it to the washed container and cover it until tomorrow. You can now throw away the old culture leftover from today. Everyday you will have a little culture leftover, and the leftovers can be thrown away or they can be used start another culture. If you want to try one with a different flour blend or even some additions, now would be the time. My suggestion would be to add a small percentage of Whole Wheat flour everyday, even just 5-10% is enough to change the acidity of the culture but not affect the overall color or flavor. It is you culture, have fun with it and take care of it.
For the next four to five days, feed the culture just like you did today. The culture is not strong enough to make your own sourdough yet, but next Saturday I will post a recipe for you. I will feed mine until then as well and make a loaf next Saturday with you.
After next Saturday, if you do not want to feed it everyday, feed it and immediately put it in the refrigerator in a sealed container. When you want to use it pull it out and let it sit at room temp for one full day. For the next two days, feed it like we did today, and your culture should be up and ready to go.
The culture can last in the fridge for 3 weeks, if you plan on having it in there longer, freeze it. When you want to use it again, pull it out for a day and then give it at least 3 to 4 days of feedings before you use it again.
You now officially have your own Sour Dough Culture!!!!!!!!!!!!!! Way to go! It wasn't that hard at all, no magic or secret tricks. Using and making your culture is one way to keep us connected to our past! This process has been used for thousands of years! Keep the tradition going, pass it on, share it with a friend! Baking is all about sharing! And Sharing is Caring!
If any of you want to post pictures of successful cultures, or in a week, pictures of successful sourdough loaves, be my guest! I would love to see them. Or, if you are having some problems, the best way I can help is by seeing the culture!
Have a great weekend and don't forget to take care of you culture!
Bake that Bread,
Josh
Friday, September 3, 2010
Sour Culture Day 4
Good Morning Bakers,
We are almost to the final step of the process!
Today, I want you to open up the container and observe the culture. What do you see? What do you smell? What does the culture feel like?
My culture had a nice dairy smell to it, almost like a container of yogurt. It had a creamy yellow color to it, about the same color as a quality organic flour. I also noticed the formation of bubbles on the surface, a good sign of life. At this point, you should be seeing signs of life in the culture. If you are not seeing signs of life, I would suggest starting over. It felt very wet, but with some tackiness to it. It coated my fingers when I pulled them out of the culture.

Now that we have observed all the changes, lets get setup for for feeding our culture.
MEP today is just about the same as yesterday! The only change is in the amount of culture to be used, it is now doubled to 227 gr or 1 cup.
MEP List:
1. New Bowl (Wash the container)
2. Scale
3. Water (113 gr or 1/2 cup)
4. Flour (113 gr or a heaping 1/2 cup)
5. Culture (227 gr or 1 cup)

The process will stay the same for mixing. First, the 227 gr of your culture goes in the bowl, add your 113 gr of 90 deg water on top and give it a quick stir. Put your 113 gr of flour on top and mix until fully incorporated. Once everything is incorporated, place the culture back into the washed container.
The culture should look the same as yesterday, even with the extra culture. The reason for doubling the amount of culture in the mix is: to increase the acetic acid levels and to increase the amount of yeast that is producing in the culture. We want to have as many yeast cells as possible creating CO2 and alcohol. This CO2 production is what gives us our leavening. So, the more cells the larger the loaf size.
That's all I have for today. Enjoy the Labor Day weekend and I will see you back here tomorrow!
Bake that Bread!
Josh
Thursday, September 2, 2010
Sour Culture Day 3
Welcome Back Fellow Bakers,
Day 3 is upon us. First, we will start off with the MEP necessary to begin.
Quick Quiz: What does MEP mean?
Everything in Place

MEP List:
1. New Bowl
2. Scale
3. Flour (113 gr or 1/2 cup)
4. Water (113 gr or heaping 1/2 cup)
5. Culture (113 gr or 1/2 cup)
Now, place your 113 gr of culture in the bowl and wash the resealable container. We will mix the culture in the bowl and then later put it back into the container for storing. Scale out your 113 gr of water in a separate container. You want this water to be 90 degrees or warm to the touch, if no thermometer is available. Now, add it on top of the culture. Remember, if your culture had an excessive alcoholic smell to it, try using colder water. We are using all our senses in this exercise! Give this a quick hand mix! After this, scale out your flour and add that to the watered down culture. Mix until the flour is fully incorporated.
At this point we can place the culture back in our clean container for storage.
The culture should have the same consistency as Day 1. The ratio is similar, just with the culture added in. This is a ratio of: 1 to 1 to 1.
What we're doing is creating an ideal environment for yeast to thrive. By adding warm water we create a warm culture, and by adding the flour we are giving it the food it needs, allowing it to consume and produce our CO2 and alcohol. Were not focused on acidity levels at this point as much as we are focused on keeping the yeast alive and strong as possible.
Also, if you wanted to add a different flour blend into the mix, now is the time. Now, this next explanation can get a little tricky. So you may not want to try this until you've gotten a hand on developing your sour culture.
I would suggest only adjusting up to about 25% of your flour weight. For example, if your adding Whole Wheat flour the formula would be: 29 gr Whole Wheat flour and 84 gr of All-purpose flour, 113 gr water and 113 gr of your culture. I used 25% Whole Wheat in that formula. To get the 29 grams you simply multiply .25 X 113 = 28.25 gr. If you want to add more or less just multiply the 113 gr by whatever percentage you want to use. Make sure you subtract that number out of the 113 gr and not using that flour in addition to your 113 gr.
Who would have ever thought baking would involve soo much math?!?
Just a reminder, make sure to do this at the same time everyday!
Bake that bread,
Josh
Wednesday, September 1, 2010
Sour Culture Day 2
Hello Readers,
Let's begin Day 2! Baking is truly about using all of your senses to create a final product that uses the ingredients within, to their fullest potential! With that being said, open up your container, look and smell! See what is happening? Observe any changes in appearance, smell. Also touch the culture and see what it feels like. When you get used to using all your senses, in the future, it will allow you to rely on more than just sight when a problem arises.

Just from looking at this mixture, I can tell there are many changes since we last took our photos. There is a distinct color change; also, notice the formation of bubbles on the surface. These are all early signs of yeast activity. Now, if you are not seeing any bubbles or activity, do not fret. This exercise is all about giving it time. The culture might also have an alcoholic smell, which is a great sign! Alcohol and carbon dioxide are produced not only in cultures but in bread and beer as well when sugars are broken down by yeast enzymes, they produce those two ingredients as a by-product You are really looking for just a hint of alcohol. If there is an overwhelming aroma of alcohol, that means the culture is over-fermented. If that is the case, try using colder water and compare your results.
Today's step is very difficult and requires a lot of detail work. Stir the culture and put the lid back on. Now, we just wait until tomorrow. Whew! I told you it was gonna be tough!

We want to give the culture, more precisely the wild yeast cells, more time to eat and produce. Tomorrow, we will feed the culture a different ratio of flour and water. What we are really doing boils down to us just giving the yeast more food to consume and produce!
Starting tomorrow, if you so desire, you can add another type of flour to the mix. Different flours add different flavors and acidity levels. There are two types of acid present in the culture: acetic and lactic. Lactic acids, will add more of a sweet flavor to your culture, whereas on the other hand Acetic acids will add more of a tangy bite to the culture. Adding a flour such as Whole Wheat or Rye will add more acetic acid, while flours such as Durum will add more lactic acid.
It is also a possibility to add different types of fruits or vegetables into the culture. I personally do not do this because I do not feel it adds enough flavor to warrant wasting fresh strawberries or grapes. It does add some flavor, but these additions have to be added every time you feed the culture. If you do this once or twice and never again, what little flavor is in there will work its way out, little by little every time you feed it. But if this idea piques your curiosity, I encourage you to give it a try. After all, baking is all about trial and error, and learning on your own. If you do start a fruit/veggie culture, I would suggest keeping this current culture going and starting a second one, using whatever additions you may want to add. Just be sure to do some research on what you're adding before you just toss it in.
Respect the culture, and keep in mind that you want to take care of it as a living thing. Let me know if you have any questions!
Keep Baking that Bread,
Josh
Tuesday, August 31, 2010
Sour Starter
Good Morning Readers,
I have just returned from a very relaxing trip to visit some family! Mini vacations are vital to the life of any full-time employee! A breathe of fresh air away from the daily grind is so refreshing!
And with my new found energy, I want to introduce you to a 5 day process of making your very own sour culture. This culture that we create will have the capabilities of producing quality products within two weeks. After that, it is up to you to take care of it and follow the simple steps I will layout for you.
I have been receiving a lot of question about sourdough cultures! We have received multiple requests for some of Wheatfield's sour culture, which the answer is, "Yes, it is possible to get some from us"! With that being said, it is a process to get some from us and it is only possible if we have extra that day and if you come at the right time. And for those aspiring bakers out there, it's not a bad option to get some culture from us (but it can feel like a cop-out)! So, before you come in and get some of our starter, give this a try! I am positive that making your own sour culture will be an amazing experience that you will not regret!
As I have said before this is a 5 day process and on the 5th day you just keep repeating that step to keep it going, but we will discuss that further on day 5!
Now, to start us of we need to get our M.E.P. (technical speak for Mise en Place - which means everything in place). This was a term I had drilled into me at school. Before you start any task, have everything set-up and in its proper place, clean and organized! Trust me -- you will be glad you did!

Day 1 MEP:
1. Scale
2. Flour ( I used All Purpose Unbleached, Unenriched)
3. Water (Tap Water is fine, bottled would be ideal)
4. Container with a lid (Preferably a plastic, resealable container)
The sour culture recipe is all in grams, so a scale would be great but not necessary. I will do my best to use cups as well, but just a disclaimer, it will not be as accurate with cups. If possible, I would suggest going out and buying a cheap scale at Wal-mart, or a store similar to it.
First, scale out 113 grams (1/2 cup) of water and pour it into the container you plan on storing it in. You want this water to be around 90 deg. If you do not have a thermometer just shoot for warm water to the touch. Nothing too hot, I would say stay closer to the cool side. Hot water can be detrimental to the yeast development throughout this whole process.

Second, scale out 113 grams of flour. If you are feeling daring you can scale the flour right on top of the water. I would suggest not doing that until you feel more confident working with a scale. You can just scale it into a separate bowl and then add it to your water.
The type of flour you use for making your sour culture is also important. Organic Bread Flour would be the best option but not the only one. I am using Unbleached, Unenriched All-purpose flour from our flour provider at Wheatfields, Heartland Mills. This is the same type of flour we use for the majority of the products we make. King Arthur Flour is a great option that should be available in most grocery stores. Whatever you choose, make sure there are no additives and it is unbleached.

Third, mix by hand until all the flour is incorporated and you have a homogenous mass of dough with no lumps of flour. This step of the recipe has a ratio of 1 to 1. Meaning there is 1 part of flour to 1 part of water. If you wanted to you could start a larger culture or a smaller one. Just make sure use the ratio! For example, I could do 200 gr of flour and 200 gr water. If you do attempt to make a larger or smaller culture this will throw off the rest of the numbers I give you throughout this process. Just a piece of advice, I would keep it simple, say doubling it or halving the recipe if you do want to change it! It is ultimately up to you! Now, MIX!


Once this is mixed, it will have a paste-like texture. If the mixture is very stiff and makes a mass that holds its shape, add water little by little until gets to the proper consistency. If it is too liquid and runs right off your fingers add flour little by little until it becomes pasty. You want it to fall off your fingers but still have a little but of structure to it.
Final Step, place the lid on your container and let it sit at room temperature. That's all folks! No magic tricks today just let it sit with the lid on until tomorrow! After I take my pictures tomorrow I will post the next step! There will not be as many pictures tomorrow so I will go into a little more detail about sour cultures and a few options we can try with the culture! I hope this will be helpful and fun for everyone reading!
Please post any questions you might have along this adventure! If I didn't describe something well enough, please let me know! This is here for you to learn! No question is too ridiculous! Trust me I did this for a yr and a half with students and we got some crazy questions!
Last important note -you want to do this at the same time everyday! This is crucial to the outcome and life of your culture! So, pick a time that will work for you everyday for the next week or two!
Have a wonderful afternoon and bake like you love it,
Josh
Wednesday, August 25, 2010
Garlic and Basil Sourdough
Good Afternoon Followers (and those just tuning in for the first time),
Today, we have some photos of our Garlic and Basil loaf. Last night, while I was doing some research I found a blog with a roasted garlic loaf that had a very unique topping. When I was first admiring the loaf, it looked like a stencil, which I have some experience using, but the photos that followed showed me something quite different.
The baker used fresh herbs on top of the loaf, which then proceeded to dry out during the baking process. This leaves you with a gorgeous natural design on top. It can also be used to help identify what is inside the bread. This technique is used more so in pastry baking. An example would be when you're making a carrot cake with a nut filling. You would want to top it with some of the same nuts that are used in the ingredients to let the customer have a preview of whats inside! This is usually only important in the case of a severe allergy, but can also be used for aesthetic appeal- and thats what we will use it for in this case! ( I have recently discovered that it i, in fact, possible to have an allergy to basil. I am guessing it is not that common, because I have never heard of anyone having it! But with that being said it now makes this bread topping multi-functional!
Sooo, I will now take you through the process of stenciling your breads or placing a creative design on top.
First step, make bread to apply this technique to! Sounds basic, I know, but the process of making bread is very complex! Usually, I like to use sourdough because of the crust color of the finished loaf helps accentuate the stencil! As the title hints towards, we have used Garlic Basil dough. (side note: we use local basil in this bread!)
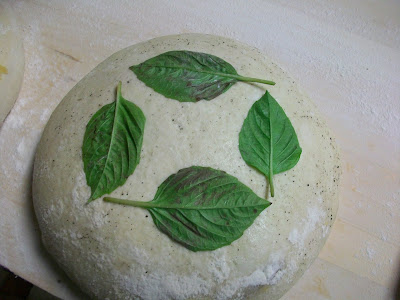
This boule was kept overnight in our retarder sitting in a round wicker basket for its necessary fermentation time. When the dough was proofed to its proper size it was then turned out of the basket onto the peel for finishing or scoring. In this case, I used a water bottle to spray the top of the loaf. The spraying of the loaf is for two reasons: a) to help dissolve any flour left on top from the basket, and b) to allow the flour or any other topping to stay in place! I then placed the fresh basil on top in a decorative fashion.

After placing the basil on top, I then sifted enough flour to lightly cover the whole loaf and the herbs. If too much flour is sifted on top the loaf can easily become in-eadible. You want to add just enough to have an appealing look but not too much that you can see clumps of flour all over the top. This may take some practice!

The last step before baking is scoring. There are many options for this step. I decided to go with a 45 degree angle all the way around the basil to help lift and display all the work I put into this design. There are other options available to you as well. Two that I like are either the "fan style" of scores reaching up to the basil from the base, or the "box style" with straight 90 degree cuts around the basil.

The finished product! The basil shrunk and lifted leaving a very nice outside flour line around it! Overall, the loaf came out very nice with a great score that lifted evenly all the way around. Really achieving the desired affect. This technique can be time consuming, which means it would be very difficult for large production needs! I hope this was helpful and interesting! Also, if you are reading this on Wednesday the 25th you can stop in and check out this loaf in the display window, and why not just pick up a Garlic and Basil loaf while you are looking!
Thanks for reading,
Have a wonderful day!
Monday, August 23, 2010
Sprouted Grain Bagels

The photos are finally up! These are the sprouted grain bagels I mentioned before and hopefully some of you got to try a bite! I came in early Sunday to try one, toasted it up and put a little butter on it, and see how it was. The bagel had a very subtle sweet aftertaste but with little sprouted grain flavor coming through. It was a little of an up and down ride from the excitement of a great looking final product to a let down from final flavor that just doesn't meet your expectations. Don't get me wrong it was a good bagel, just not 'the one' I want it to be.
So this means more testing! At this point I need more Sprouted Grains which will be the next post, What are Sprouted Grains and why should I eat them? Personally they just taste much better, but I will actually give some facts to support my opinion!
Now, this bagel started for me about 6-7 months ago when I was a Teaching Assistant at The Culinary Institute of America. My Chef was very good at randomly just dropping thoughts and ideas to let me chew on and see what I did with them! One day I was working on a Sprouted Grain Sourdough and he just mentioned, "could you imagine a Sprouted Grain Bagel?" He left it at that and never said anything else about it. So the thought process began and all the questions floated in! Can I just add the grains to the regular bagel dough? Should I just wing it and see what happens? Wait, what about salt? Grains will need more salt.... How much more salt?
And the recipe began. I tested it out every Friday for my early morning Saturday bakes and ran into a lot of hydration issues and salt content issues. The Sprouted Grain mass is fairly sticky and wet but not runny so its a weird trade-off for flour and water! But as the weeks went on and I gave the test runs to all my surrounding Chefs to try and get feedback. I started to refine the recipe into a great product. A few weeks before I left my position at The CIA, there was a large baking exam at the school that we needed to produce some specialty products for breakfast and lunch and I figured what better time to break out some yummy bagels. There happened to be some very well known bakers there for judging and they got to experience The Sprouted Grain Bagel in all its glory! That bagel that morning came out fantastic, size, shape, color, and the flavor where all exactly where I wanted them to be! This was an exciting day for me and I got some really good feedback on the bagel, I was fairly proud!
After all this I expected it to translate over to wherever I wanted to break this bagel out again. Unfortunately, yours truly, did not put my final changes down on paper! Bummer, I know but that has just led to more R and D here, which is great but with a limited supply of Sprouted Grains! So now the process starts all over again from sprouting to grinding to baking! And you get to be brought along for the whole shindig! Photos galore and hopefully helpful info galore! I have recently contacted some of my previous Chefs to see where I can get some very reliable and accurate info on Sprouting Grains for you and we will have a few different posts on this topic!
Make sure you stop by the bakery and see what we have going on!
Have a great Monday!
Josh
Saturday, August 21, 2010

The start of a New Journey
Good Afternoon readers,
My name is Joshua Pickens and I have recently come to Lawrence, KS to fill a vacant Head Baker position. In the short time I have been here and been involved in the bakery specifically the bread department I have come up with a few ways to connect with our customer base this being one of them! A blog is something new to me (hence the title) and will be a work in progress! Please bear with me!
The idea to start this blog came when I was given my job description here. I have been tasked with product development and down the road starting bread classes for the public! Now what is important to start these two things is I need to know what the consumer wants. This got me thinking about many different ways to reach you whether it be surveys or word of mouth or just taking shots in the dark and just throwing stuff out there to see if it is successful or not! The last option did not seem too business savvy so we dropped that one. As this process of pondering continued I was at home reading one of my favorite blogs and the though hit me why not start a blog about Wheatfields! It is an easy(and free) way to get in touch with customers and get instant feedback. It is also a great way to help you feel connected to what we all do here.
We are all very passionate about what we do and we want to share that with you and allow you to see a side of the bakery that you might not have ever gotten the chance to see. We will post product photos, maybe even some action shots! We want you to see how much time and effort we put into making the best product possible for you!
This blog will also be used to educate you on all the different aspects of baking such as the basics of shaping a loaf of bread down to the different types of flour we use and why we use them. This blog will help me dig into some much needed research to give you answers to any questions you might have. Many questions come in all the time from allergies to what is sourdough? I will do my best to answer your questions as quickly and as detailed as possible even if that means research which I love to do!
There will also be surveys given out to see what you think about new products we are developing! Like right now we just mixed a new bagel for employee taste testing to see if it is something we want to serve as a special! It will be a Sprouted Grain Bagel. If all goes well tomorrow you should see that at the counter by next week. But we will post photos of new products, which hopefully tomorrow I will have some of this bagel for you so you can see and comment! There has also been the idea of a "Baker's Choice" bread on Fridays and Saturdays which I think should be starting with the previously mentioned bagels. Also I have mentioned bread classes, we would love to start a few bread classes during or slower season but we need to know what kind of class you would enjoy for example maybe a 1 day baguette class or a weeklong classes involving the full spectrum of classic french style breads to pizza and beyond! These classes would probably involve mainly hands on teaching but with some sit down and quick note taking sessions! But to do all this we need your feedback and when the time is right the surveys will be posted and make sure to get as many people involved as you can! The more the merrier!
So here we go this journey is about to begin and ohh yeah Welcome to the Wheatfields Blog!
Subscribe to:
Posts (Atom)